Today I have a cute little card to congratulate new parents.... welcoming little sunshine :D
I had this "hello sunshine" pattern paper from Simon Says Stamp March Card Kit 2014 and is from Lawn Fawn's Hello Sunshine 6" x 6" Paper Pack. It is a very happy paper pack.... I love the papers so much that I keep avoiding using them. So I thought "Hello Sunshine" would be perfect for a baby card :)
The stroller, and the sentiments are from this Baby stamp set I bought long ago... can't remember the brand. I stamped the sentiments using Versafine Black Ink and then re-stamped using Versamark ink and added some clear embossing powder. For final touches, I added some pearls and scattered them over the crowd.
I like the simplicity of the card and how it can be used for baby arrival or baby shower.
This card is for sale on ETSY.
Until next time,
Happy Krafting,
Cheers =)
We have a very dull and gloomy Sunday here in the south today.... weather has been cooler due to the rains... but the dull weather does not help :( So I decided to work on a card.
I decided to use the Sending Happy Thoughts stamp set by Simon Says Stamp. It was part of their June card kit. I made a card using this stamp before -Birthday Mail. Love this set....especially the envelopes :))
So here is the card:
So I tried some dashes between the words.... I did not like it initially.... but after stamping some hearts I thought the whole thing looks cute! I love the fonts they have used in this stamp set. The "on your Birthday" sentiment is from On You Birthday by Stampin' Up!
I stamped the sentiment using Versafine Black Ink and then restamped it using Versamark Embossing Ink and sprinkled on some Clear Embossing powder for a subtle shine... unfortunately can't see the shine in the picture. All in all, it turned out super cute!
The card is for sale on ETSY
Until next time,
Happy Krafting,
Cheers =)
5 from 1...what is that you ask? 5 boxes from 1 sheet of Cardstock or Pattern Paper ..I knowww!! Isn't that faboulous!!! One 12" x12" Paper and 5 different sized boxes. Yes another trial from Pootles Papercrafts website :D
So basically you cut the 12" x 12" Paper into 5 different sized pieces, score and fold to make the boxes. It is pretty easy. Although there is one trick of folding in the corner for the box to close (which I ended little differently...details below).... however, it is not that hard if you see the tutorial. Also Pootles uses Pattern paper to make her boxes. I used Cardstock and cut out Pattern Paper pieces to decorate. Click HERE to see the video.
So once I got the boxes scored and folded all required parts....I realized I did not like the closure tabs open ... so I added some glue, first on the inside traingles (as seen on left) and glued it down and then some more glue on the other side, which fixed the tabs.
So they are pretty decent sized boxes.... From left to right in the picture...
Box 1 - measures 3" x 2" x 1" (Biggest)
Box 2 - measures 3" x 2" x 1"
Box 3 - measures 3" x 1" x 1"
Box 4 - measures 2" x 1" x 1"
Box 5 - measures 1" x 1" x 1" (smallest).... cutest one :D
Since I used cardstock, I used Pattern Paper to decorate the boxes.
I cut the pieces 1/4" shorter and decorated the top and 4 sides. Following are the measurements I used for pattern paper:
Box 1: 1pc- 2-3/4" x 2-3/4" ; 4 pcs- 3/4" x 2-3/4"
Box 2: 1pc- 2-3/4 x 1-3/4"; 2 pcs-3/4" x 1-3/4"; 2 pcs- 3/4" x 2-3/4"
Box 3: 3 pcs- 3/4" x 2-3/4"; 2 pcs- 3/4" x 3/4"
Box 4: 3 pcs- 3/4" x 1-3/4"; 2 pcs- 3/4" x 3/4"
Box 5: 5 pcs- 3/4" x 3/4"
The flowers on top were created using the Boho Blossom Punch by Stampin' Up! Finally I added Pink Rhinestone in the middle of each flower.
I enjoyed making these boxes. It was exciting to see as they came together :D I hope you try them out as well!!
Until next time,
Happy Krafting,
Cheers =)
Isn't is a pretty box?? I loved it!! It is a 1 stick Treat box....that is you have to glue it at just one corner and it is ready. It is a very cute box which opens from both ends and finished box measures 3-1/2" x 1-1/2" and is 5" tall. I would recommend watching the video tutorial to make this one mainly to understand the scoring and rotation of paper. I made an error first time and so had to cut and score another cardstock.
The tutorial is by Sam from Pootles Papercrafts and you can watch it HERE.
It would be a nice favor box... Here is a favor that my friend gave at her baby shower (Oh only if we would have found this video tutorial 10 months back!!) ... this box would have been perfect!
I used Mixed Medley stamp set by Stampin' Up and stamped the images in Rich Razzleberry and Daffodil Delight inks. I used 3/4" circle, 1-1/4" scallop circle and 1-3/8" circle. The Pattern paper is an old collection of Stampin' Up! , I don't rem the name of the Paper stack! Finally I used Daffodil Delight Ribbon to close. While making it I thought about sealing the top and just tying the ribbon around the box...maybe next time ;)
Like I mentioned before, it opens from both ends... so even if you get the boxes ready and seal if from top, you could stuff it from the bottom.
Completely love the box...another successful trial :D
You should try it too :D
Until next time,
Happy Krafting,
Cheers =)
My project today is a 3-D project again :D a cute little box by Pootles Papercraft... and I am trying to use Paper Pal Arts Challenge 211 which is a color challenge of using Daffodil Delight, Night of Navy and Whisper White Colors (Stampin' Up colors).
I came across the challenge this morning, loved the colors... had 1-1/2 hour before the link up for the challenge closed, so had to be quick. However, I missed adding the link to link up by few minutes!!! Nevertheless, it was fun to use the colors and make this box :D Next I am planning to make a card using the same color combo... its just a cute color combo I think.
For measurements and tutorial on how to make this box, click HERE. Here is my version of the project:
The box is made using 8-1/4" x 10-1/2" cardstock. The completed project is 3" x 2" x 3-3/4". It is a good sized box.
It is one of those days when everything I used in this project is by Stampin' Up, except the pearls and the pearl brad. I used the Quint-Essential Flower stamp, stamped it using Night of Navy and Daffodil Delight Ink and used following punches:
2-3/8 Scallop -1st layer (Bottom)
1-3/4" Scallop-2nd layer
1-1/4" Circle- 3rd layer
3/4" Circle- 4th layer
1/2" Circle- 5th layer (Top)
I decided to use pearl brad on top for opening, and also added some pearls in the front... I was not sure how to lay them out... but I like 2 horizontal and 2 vertical pearls... they just complete the box well.
Here is the inside.... I did not have anything I could fill this box with, so I used the 2 post it notes lying on my desk... they are standard size (2-7/8"x2-7/8"). I could easily fit 3-4 more, if I had any. So you could fill lots of candies in it.. or use it for small gifts.
The challenge colors were fun to work with and the box was easy to make :)
Until next time,
Happy Krafting,
Cheers =)
While I prep for my classroom, I have not been able to make cards....however, for some reason I feel good when I kick start my day with some 3-D project. Yesterday I made the Medium Sized Box, 2 days before that I made the Slim Treat Box and today I tried 2 different sizes of Milk Cartons :D Yes again inspired by Sam from Pootles Papercrafts who uploaded a 2 part video today.
She is demonstrating making a 6 milk carton carrier, with milk cartons in it. Today's video is on how to make the cartons. Tomorrow hopefully she will be making the carrier :) I still remember when I got in crafting, I was so fascinated on how these cartons are made. I had downloaded a template which seemed complicated. But this tutorial is awesome!! Easy and quick... easy to make a few at a time.
One 8-1/4" x 5-1/2" sheet makes this cute box. So you can make 2 from 1 sheet of 8-1/2" x 11". In her video Sam has stamped on the box. I used 4 pcs of 1-7/8"x 1-7/8" piece of pattern paper. The sentiment is from Mixed Medley stamp set by Stampin' Up! (retired). A simple matching button with white twine and a cute little small clothespin are perfect embellishments. The finished carton measures, 2" x 2" and 2" tall (from bottom to score line above the pattern paper). From bottom to top (where the clothespin is attached) it is 4" tall. To watch how to make this milk carton click HERE
As soon as I saw this, I remembered I had seen another video by her on making a milk carton. So I searched through her Youtube channel and found this other one. Now this one is tad smaller. But as cute :D
Since I was trying, I kept same design on both. Isn't it precious?? This finished box measure 1-7/8"x 1-7/8" and 1-7/8" tall (from bottom to score line above the pattern paper). From the bottom to top (where clothespin is attached) it is 3-7/8" tall. To learn how to make this box click HERE.
Absolutely love these cartons... it is a perfect size box for baby shower favors, or classroom treats. You can decorate it as much or as little as you want.
Love Love Love the project.... cant say enough about it :D Might have to think of ways I can use these in my classroom ;)
Until next time,
Happy Krafting.
Cheers =)
Today I have another 3-D project. This one is designed by Sam from Pootles Papercraft . It is a nice sized box that measures 2-3/8" x 2-3/8" x 1-3/4". Sam has 2 oversized tealights in her box which fit perfectly in this box.
Here is my version:
It is the cutest little box... now the original design does not have the little notch I put, I just used a 1" circle punch to make the notch. I wanted to see how it looks, especially if I create this boxes to give to my students. Little hands would need the notch to easily open the box.
I filled it with some candy I had at home.... I put in 10 pieces and they fit good and closed well too. I even put some mini Post-its, just to see how many would fit...I was able to put 6 of them easily. I really liked the size... it is perfect for candy favors, or as a gift box for jewelry.
Today all the material is from Stampin' Up- Baked Brown Sugar Cardstock, Poetry Print Pattern Paper, Label Love Stamp, Label Love Punch and 1-3/4" circle punch.
Pootles has a very good video demonstrating how to make this box. Click HERE to watch. It is quick and easy to make.
Until next time,
Happy Krafting.
Cheers
Through out the summer break I have been making cards.... and now its almost time to go back. So I got engrossed in making somethings for my classroom. But had to get back to making a card today. So I decided to use Paper Players Arts Challenge #209 It is a cute little sketch.... with a big circle in the front. The circle is what attracted me. I had the perfect stamp to go in the circle :)
Here is the original sketch:
 Here is my version of the sketch:
I have had this stamp forever now, but never used it. The stamp is Two by Two (Stampin' Up!). Today I used it and colored it in using Copic Markers and Stampin' Write Markers.
Here is my version of the sketch:
I have had this stamp forever now, but never used it. The stamp is Two by Two (Stampin' Up!). Today I used it and colored it in using Copic Markers and Stampin' Write Markers.
I added some pearls to make it cute-sy ;) Since I was trying to make a Neutral card... I used brown, yellow and green mainly.
While the layers are glued on top of each, I popped the whole panel on the card base. The brown layer is embossed using Sizzix Polka Dot Embossing folder. I tried to use to some Wink of Stella Glitter Brush Pen- Clear on the bird, butterfly and water and Silver on the embossed polka dots.
Turned out cute.... mainly due to the stamp :D
This card is for sale on ETSY
Until next time,
Happy Krafting,
Cheers =)
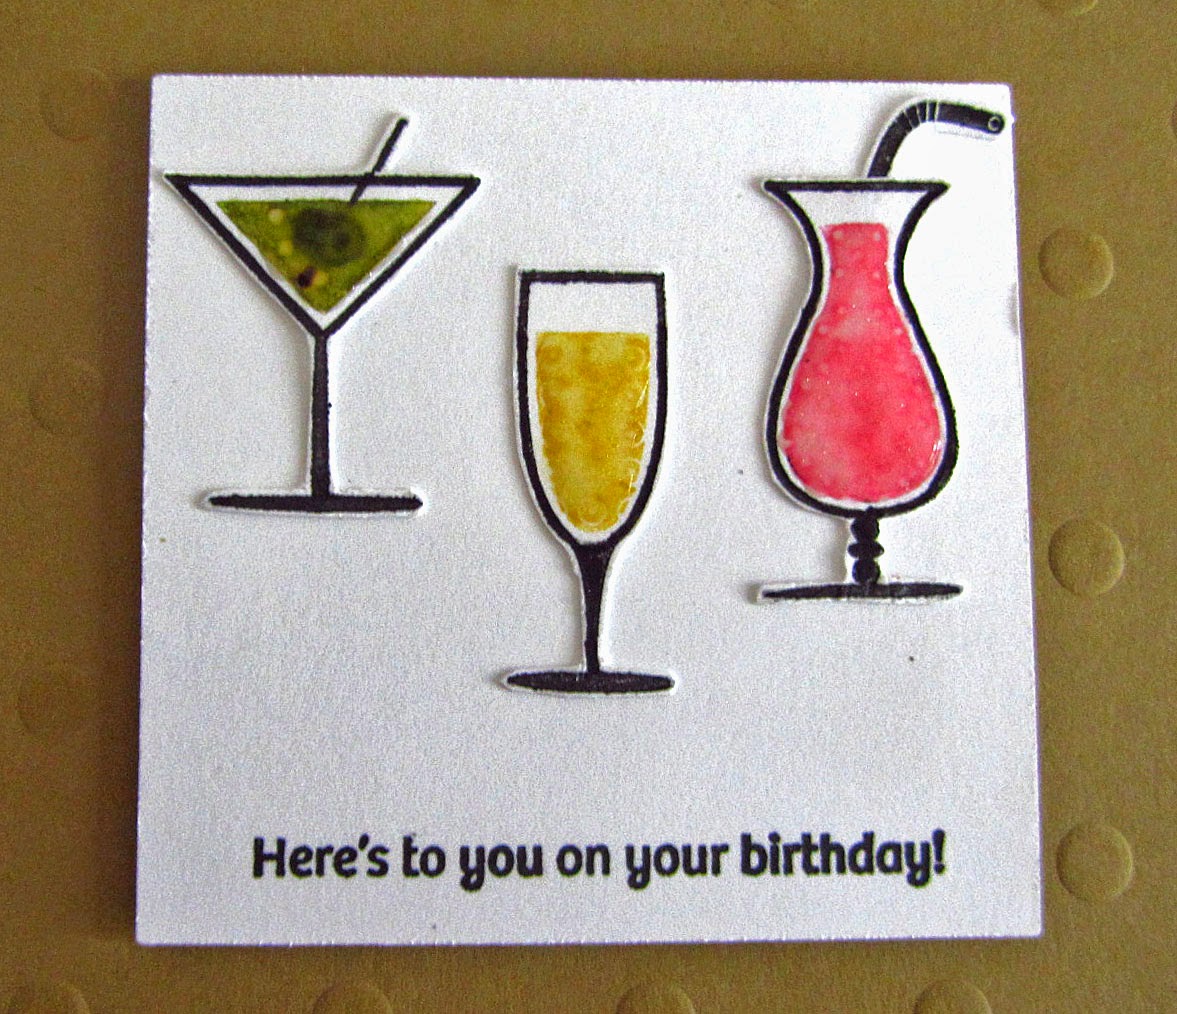
Today I have a fun little card. I am trying to work on things for my classroom and making atleast 1 card a day. So this card is simple and quick.
Some drinks to share with the birthday girl :)) Lately I have gotten into fussy cutting (I was always scared of it) and love how fussy cutting, and paper piecing add wonderful dimension to the cards. So I stamped these images from Happy Hour stamp set (Stampin' Up!), colored them using the Marker pens and stamped them.
I added some glitter with Wink of Stella Clear Glitter Brush Pen and also added some glossy accents, which is hard to see in the pictures. The sentiments are from the same set as well.
The background was created using Sizzix Texture Plate and I added some subtle glitter to the dots too (again hard to see in the pictures). Besides the fussy cutting, it was easy to put it all together....although the cutting didn'g really take that long as well! In the end, the card turned out cute :)
Until next time,
Happy Krafting,
Cheers =)
Happy 4th July to all.... It is fabulous that the long weekend is here.....although for the past 1 month, everyday has been a weekend day for me ;) (yayyy to Summer Vacation). Although in a little over 3 weeks that will end!! So while it dawned on me that I have done no prep for my classroom like I had planned.... so while I started on that..... crafting has not been forgotten.
So while I enjoy my morning coffee (which has been awesome everyday in the past month), I watch crafting videos and today my day started with Pootles Paper Craft's Tealight Treat Box. A super cute little box that can hold 4 tealights... but could be used for giving treats, gifts (necklaces/bracelets).
So here is my version:
The finished pieces is 6-1/4" x 1-1/2" and 3/4" inch high. I really haven't decorated it well enough.... just added pattern paper on the top...as I just wanted to try making one.... Simply cute!!
I tried putting in a bracelet to see how it would fit.... pretty decent fit! It could also fit candy/chocolates or long, slim gift items/favors.... or tealight like Pootles has.....overall ....such a pretty box!!
Pootles has a good video demonstration as well as written measurements on her blog.... Click HERE to visit and learn how to make this awesome box.
Until next time,
Happy Krafting,
Cheers!
Today I have the Boy version of the card from yesterday. I made the Girl Baby Shower card yesterday. I have details of the materials in that post.
Here is the card:
It is absolutely the same...just color change..... I used Copic Markers B00 and B002 for coloring in all the items and E000 for the Bottle. I used rhinestones with blue tint and wink of stella clear brush pen over all the items to add some shine.
I will admit, this card was easier then the first one....After the Girl version, I knew all the mess I made and how I could do it better. So this card came about quickly and easily.
Both cards turned out cute.... Maybe window cards are not as bad....maybe should try one more card with acetate sheet...wider frame sides to be able to add the acetate!
Until next time,
Happy Krafting,
Cheers =)
Today was a slow day in crafting for me.... I just made one card... took a little while....with all the pieces and window sheet. So after this card, I figured window sheet and me do not get along well :( As much as I love the finished look of this card.... but the window sheets and layering....phew!!!
So here is the card:
So I got this idea from Simon Says Stamp's Video this morning. Ofcourse the frame has wider sides and thus window sheet attachment was easier. While for my frame I used Paper Smooches' Polaroid Wise Die. I layered it with window sheet and and images from Stampin' Up!'s Baby Bundle (Retired).
I used Copic Sketch Markers R83 and R85 to color the items Pink and and E000 for the bottle. I added some rhinestones which have pink-orange tint to them.
I popped up the polaroid frame. That was the hardest part....the thin edges and having to add 3-D foam dots on them... Maybe if the edges of my frame were wider would it be easier. However, I have the images ready for Boy Baby Shower as well....so will make another of this Polaroid Window Card!
It does look cute, doesn't it?? :))
Until next time,
Happy Krafting,
Cheers =)

 I had this "hello sunshine" pattern paper from Simon Says Stamp March Card Kit 2014 and is from Lawn Fawn's Hello Sunshine 6" x 6" Paper Pack. It is a very happy paper pack.... I love the papers so much that I keep avoiding using them. So I thought "Hello Sunshine" would be perfect for a baby card :)


