Thursday, January 30, 2014

New Home Card

My card today is a Housewarming card. Hand made Housewarming cards are hard to find, so I decided to make one today. Almost a year ago when I wanted to make a housewarming card for my friend. That is when I realized I need some housewarming stamps. 

So here is my card:


I love this stamp set "Where the Heart Is" from Simon Says Stamp, it also has a coordinating die. I first stamped the house then die cut it... but that did not work. So 2nd time around, I die cut it first and then stamped the house. 2nd time is always the best ;)


My copic trials continue :D I colored the house using copic browns and used stampin' up markers for the door, window, heart and roof. 

A simple, but cute little card :))

This is card for sale on ETSY

until next time,

Happy Krafting,

Cheers =)
Wednesday, January 29, 2014

Valentine Love

While Georgia is all snowed in, with icy roads and stranded traffic especially in Atlanta.... we had schools closed today and are going to be closed tomorrow since the weather has been cold with freezing temps and very little ice melting. So I created these 2 Valentine cards. I was a roll ;) 

Card 1:


I recently bought some copic markers (after watching million episodes on how to use them). I colored in the I love you with copic shades of red and then used glossy accents (my fav thing to use lately) I used the 3-heart punch (from Stampin Up!) to punch and pop the hearts. 


Card 2:


I simply used DSP from stampin' Up and layered it with hearts using Heidi Swapp's stencil (from Michaels). After coloring the hearts in I used glossy accents. I used the Three Little Words stamp set (Stampin' Up!)

I was not sure about the 2nd card.... but now when I see the picture here...it does not look too bad :))

Until next time,

Happy Krafting,

Cheers!!

Sunday, January 12, 2014

2 Sheet bag

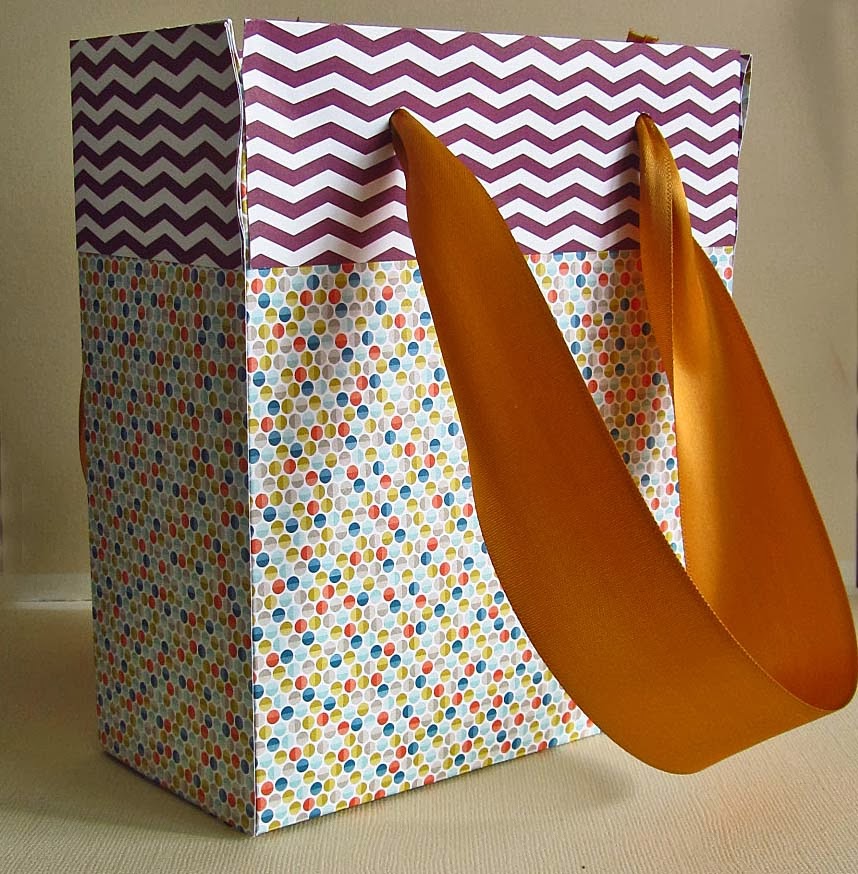
I love watching craft videos on youtube....soooo many "brilliant minds" out there sharing ideas and tutorials....just wonderful!!! I like seeing videos for everything....cards, bags, envelopes, gift items like gift card holders, candy holders etc, and crafting techniques. I like to try making the bags and gift items and also try some crafting techniques. So while watching videos few days ago...I came across this bag made out of 2 12x12 cardstocks.... super cute little bag.... perfect for small-medium sized gifts!!


All you need is 2  12"x12" double sided designer paper, a 3"x6" piece of cardstock, sticky tape/tombow and some ribbon (or cardstock). A very easy and quick project. 


I did make some boo-boo's but this was a trial project...so I am not worried... plus I decided not to start the video while making it.... so I did some wrong cuts...however even with my wrong cuts...I could still put it together :)) 

The final bag is 7"x6"X3".... like I said before...perfect for small to medium gifts....


I found this to be awesome...especially if are the kinds who want your gifts to have unique packaging.... you know no one is going to have a gift bag like yours ;) Now in my trial run I did not do any further decor.... but just think... adding some trinkets, some sentiment, or a flower.... just gawjus!!!!

So the original video is by Dee Slater (independent Stampin' Up! demonstrator) and her tutorial is awesome!! The tutorial:  MAKE YOUR OWN GIFT BAG

This definitely has been one of the easiest little project I have made in a long time :))

It is definite worth a try.... 

Until Next time,

Happy Krafting,

Cheers =)

Wednesday, January 8, 2014

Happily Ever After-Wedding

So finally after months have got back to making cards...Thanks to the Arctic blow that we had on the 7th....schools were closed. There was no way I was stepping out in layers.... takes more time to put the layers on then taking care of any errand.... errands could wait! So I decided to use time to make a card. Went through the various challenge websites (the left sidebar) and found this challenge on Mojo Monday... Challenge number 327 Although I did alter the design a little....more than alter...left out one of the pieces to be precise. 

So here is what I ended up with:


In the original design the middle square had a curvy layer at the bottom. Somehow that curvy layer did not go well with my sentiment here.  The light gray cardstock is from Stampin' Up! called Smoky Slate.... I really like the light color as it allows the black and red to pop well. 


I can not remember where I got this stamp from... It has various wedding images....I stamped it with black ink and embossed with Kaliedoscope Clear Embossing powder.... it does not show in the picture... but it adds a nice shine to the sentiment. 

Red hearts of course add the perfect pop of color :))

This card is for sale on ETSY 

Until next time,

Happy Krafting

Cheers :))