Thursday, February 28, 2013

Happy Birthday Dad

Trying to add cards to my Etsy Shop...I have been making more and more cards =) No no...not complaining...I love it =) I have always made General Birthday cards, so I thought I could make Birthday cards for family and relatives like Mom, dad, husband,brother, sister etc etc..

Birthday cards for Dads and Brother's are rarely seen. So I made this Birthday card for Dad... now I know making masculine cards are hard... but I am trying...getting inspirations from cards I see on the web (Pinterest to be specific hehe). Here is the card


I saw a similar looking card.... that was for Dad as well, just different colors.... I decided to go brown and blue...masculine colors.... Loved how it turned out. I did pop the sentiment using 3-D glue.


The "DAD" stamp is perfect...it is from Stampin' Up!'s set- Loved Ones. It worked out perfectly with the Happy Birthday stamp and fit well in the Label Framelit die (Stampin' Up ! product).

A perfect card for the best dad =)

This card is for sale on ETSY

This is all for today.

Until Next time

Happy Krafting

Cheers =)
Monday, February 25, 2013

Balloons and Cupcakes

My day today has been dull and gloomy.... trying to do errands and getting hair cut gave me enough time to make 1 card today...I needed inspiration for sure today....But here is what I created.

This is inspired from Card Sketch Challenge on Splitcoaststampers- the challenge is from few weeks ago.


Of course I did add the cupcakes....that was not supposed to be there.... I always add my twists to the sketches I find =) I started with one and did not like it...so I created the other 2 and layered them... so it sort of looks like there are bunch of cupcakes :D


Ofcourse I had to add the banner (my new fav). At the end...it all looks good put together-- a unisex card... so can be for man or woman =)

  
Yes the top cupcake and balloons are popped up =)


This card is for sale on ETSY 

Until next time,

Happy Krafting,

Cheers =)  

Saturday, February 23, 2013

Happy Birthday Mom

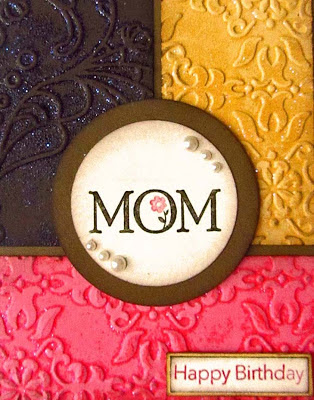
Today's card is a wonderful, bright, cheery birthday card for Mom.

Brown, Yellow and Pink cardstocks are run through 2 different embossing folders. I also wet embossed is using Clear embossing powder. 


I am not a pearl person. But it when it comes to pearls on card...I am all for it =) I love how they make a card look feminine

 
I did pop up the Sentiments to add extra to the card. 


This card is for sale on Etsy.

This is all for today.

Happy Krafting,

Cheers =)  

Thursday, February 21, 2013

Oh Baby....You're Swell

Banner's on card are my new favorite... I just love how they look .... instantly give the card a shabby chic look I think =) So I had used this design for a Valentines Card I made last month. So using the same sketch, I made a variation today.

 
The designer paper is More Amore from Stampin' Up! Simply love the designer paper. Very cute-sy ;) The sentiments I stamped are Oh Baby and You're Swell with a heart in the middle. Blue and red combo is my favorite :D


Until next time,

Happy Krafting

Cheers =) 


Tuesday, February 19, 2013

Birthday Banner

We have had dull and gloomy weather all day....You know what happens when its raining outside... Get Crafty inside ;) I decided to try this card I had seen on Pinterest ...it is the cutest card ever.... of course it has banners and the colors are super cute...it looks like a baby card. It is originally from The Scrap Cake

THE INSPIRATION
 Now my version of the card--I made it a Birthday card.... Loved the banners and the faux stitch on this one. I have always wanted to try Faux stitch and I have to say I am in love with this style... changes the looks completely. So here is my version

MY VERSION
Looks super cute....love the grey and pink combo :D I don't have the many circles and pearls....But  I love how it turned out :D

Thats all for today....

Until next time,

Happy Krafting

Cheers =)  

Sunday, February 17, 2013

Masking Tape Art

This is a quick and easy Art for walls....I am serious...this is the easiest art you can make. All you need is Canvas, Masking Tape, Paints of your choice, Big Brush/Roller Brush, and Finishing Spray

Yes of course this is inspired from an Art I saw on Pinterest ;) Its going to be 3 years we moved into home. I had decided to take it slow when decorating. Guest Bath was the first room I decorated. Then came the living room wall art... and Kitchen....did some for Master Bedroom... now time to move on to the other rooms....

So Bedroom number 2 is in the basement... although it has great big windows....it still tends to be a little dark most of the days....so I wanted to make something to lighten the room up. With dark furniture and grey-red bedding.... I though the Masking Tape Art would look awesome.

I started with putting the masking tape on the canvas. There is no specific design you need to follow. Tape up as you like. Trust me you can not go wrong while taping up! 

 
Once it is taped up....then its all about painting away. I used a brush... I think roller brush would be much better. But I did not have one and did not feel like going to buy one. My colors were red and grey. So I painted two canvas grey and 1 red. 


 The masking tape gets covered up and although you can not really see it here....you will still be able to see it when you do. I gave 15 minutes to dry and removed the tape.


The key is slowly pulling off the tape....The end result... Beautiful wall art...

 
Yes there was some seepage.... I think it adds to the look ;) but if you are a perfectionist... you could do some outlining using darker shade or same shade of color and thin brush.


One more room down for me ;)

Until next time,

Happy Krafting

Cheers =)

Monday, February 11, 2013

Baby feet congrats

Today's baby card is inspired from a card I pinned on Pinterest.... Baby feet layered on layers of Cardstocks with a simple Congratulations.... the card be seen HERE

It is a very cute card and could be made in Blue, pink or generic color....Here is my take:


I did use embossing folder to create the texture.... since I did not have a designer paper of the kinds used in original.... I used textured embossing folder....and stamped the sentiment at the bottom instead of the textured cardstock. 


I love how it has turned out =)

Until next time,

Happy Krafting,

Cheers =)   

Sunday, February 10, 2013

Bright Birthday Wishes.....

Friday was an eventful day with me getting to try a new recipe and able to finish making 2 cards... But I did not get time to write about the cards here. Today I bring 2 bright, cheerful Birthday Cards. 

First one is cased from a card I pinned on Pinterest. The inspiration can be seen HERE

Of course I have changed it a little bit, my images are slightly bigger than the original card, and I did not add the ribbon. I tried the ribbon, but somehow it just did not go well. Since the images are good size, ribbon just looked like it cluttered the card. I loved this layout for the simplicity of white and the contrast of a bright cardstock layered on Black. This card is for sale on ETSY

The next card is inspired from a sketch challenge on Splitcoaststampers.
 
  
My take:
 
   
I wanted to use this bright Poppy Parade (Stampin' UP! CS) to make a card... nothing says Happy Birthday than a bright colored card. The coordinating designer paper and textured poppy CS make the card look fab. I tried making this card Unisex, but it looked incomplete until I added the 2 pearl stick ons. So this would be perfect card for mom, sister or girlfriend ;) This card is listed on ETSY

Kreating continues....

Until next time,

Happy Krafting,

Cheers =)    

Thursday, February 7, 2013

Heard it's your Birthday

This week has been about making cards....for the store which sells my cards and now making for our online store on Etsy. Its time we made cards for our online store =)

Here is the one from today


Fun, cheery, and for man or woman. The stamped image is from Stampin' Up! and is colored in using water color crayons. I love using these crayons and water coloring :D 

It is listed on Etsy for sale


The sentiment is popped up using 3-D glue. Of course I can't take the credit for the design. It is actually from a Sketch Challenge on splitcoaststampers.com. The original sketch is:


SC346 on the image stands for Sketch Challenge # 346... if you go on splitcoaststampers... and go on to the Wednesday Card Sketch Forum/thread...you will get the sketches. 

But you can always save it from here and try it yourself =)

Until next time,

Happy Krafting,

Cheers =)

Birthday Wishes for Mom

My friend asked me to make a Birthday card for her mum-in-law. So I decided to go through pics of all cards we have made so far to make a card and be on safe side. I wanted to make an elegant, yet simple looking card. Not too bright, not much going on... So here is what I came up with:


Textured background adds perfect elegance. I did wet and dry embossing both... dry embossing is the texture and wet embossing was applying versamark on the embossing folder, dry embossing it and then sprinkling with clear embossing powder and used heat gun on it. For some reason it does not show in this pic :(  


The stamped image and sentiments keep it simple....

I like how this card turned out... perfect for any mother =)

Until next time,

Happy Krafting,

Cheers =)    

Wednesday, February 6, 2013

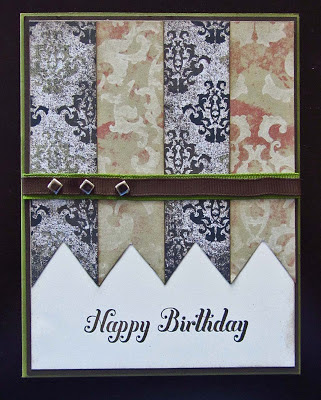
Masculine Birthday Card

This is a Masculine birthday card that I made... it is inspired (CASed) from this card I saw on pinterest. Making Cards for men is a little hard... the colors, the papers, stamps etc can't be cute-sy. So when I find cards made for men... I am pinning them or saving them on my computer. 

Original card/design can be found here- Original Card Thank you to Patricia Hayes for sharing her card.

Here is my version....


I think the Designer paper looks manly enough ;) I am in love with the banner end style... I have been using it a lot lately :D and I am sure you will see more of it. 

Here is another look at the card


I like the card turned out nice.... hopefully the receiver of the card likes it as much ;)

This is all for now.

Until next time

Happy Krafting,

Cheers =)   

Baby Cards contd....

Lately I have been making too many baby related items.... Luckily I have just got order for 3 Birthday cards.... So will be moving to the that next.... But today I have 2 more baby cards. The cards I made today actually are remake of a card I saw...only if I remember where :( I thought I saw it on Pinterest and pinned it.... but I did not. Luckily for some reason I drew the sketch. 

Well so if you had the original idea of this card and you come through my blog... apologies for not crediting you....only if I had saved the link to your card!!!Thanks for Sharing!


I loved the layout.... till I remember it was a baby card as well. So I thought this would be perfect layout. Simple, yet cute little card. 


I did raise the Heart and the Sentiment frame....am not sure how they were in the originally card. I did not like them flat... so I popped them up. 

Happy how they turned out :D

This is all for now,

Until next time

Happy Krafting

Cheers =)

Monday, February 4, 2013

Gift cards...Baby

So while I continue to work on things for the Baby Expo... I decided to make some gift card holders. So while searching for ideas, I came across this particular style of Gift Card Holder.... simple, easy and can be made for any occasion. I found it via google search... Secret Life of Paper and her project Jolly Holly Gift Card Holder. 


Of course trying to make Baby Gift Card Holders....so using Baby Themed designer series paper was best choice.

The original instructions and design can be be found HERE

 
Here is modified instructions of what I did on the versions I made. 
 
Instructions:
1. Cut a piece of card stock to 3 1/2" x 8 1/2" (you can make 3 gift card holders from 1 piece of 8 1/2 x 11" CS or 4 from 12" x 12" CS)
2. Score CS @ 2 1/2" on one end and 2" on other end.
3. Use Rounded Corner Punch to round corners on the 2" end
4. Cut 3 pieces of Designer Paper
  • 3 1/4 " x 1 3/4"
  • 3 1/4" x 2 1/4"
5. On the cardstock, glue down the 2-1/2" flap by applying adhesive along side edges only. This will form a pocket for the gift card to slide in and out. 
6. Use Rounded Corner Punch to round corners on one side of 3-1/4  x 1 3/4" piece of Designer Paper.
7. Attach designer paper to outside of gift card holder
8. Attach a small piece of velcro to 2" side and fold down. 


9. Decorate the top as desired. 

In the original design, a cute image and scallop base completes the gift card holder. I wanted to keep it simple and see how they did without any toppers. I think they turned out great due the DSP

All in all, this took me 1 hr to finish... from cutting cardstock, designer papers to gluing it all. 4 Gift Card Holders in 1 hr...not baad ;)

Last look: 

  
Until next time,


Happy Krafting,

Cheers =) 


Sunday, February 3, 2013

Baby Cards

There is a baby expo coming in our town in 2 weeks...the store where we keep our stuff is going to have a table there....Sweet owner asked me if I wanted to give her baby stuff... I was up for it... so you see I have been on making spree...mainly baby cards!!

Here is the sketch challenge I used today:


This one is from Stampin' Up Demonstrator website... I had downloaded this long time ago....and thought this would be a good sketch for Baby cards....especially the ribbons....going through the sketches I have, when I saw the ribbon on this...all I could think was it could have pink or blue ribbon.  Of course the banner edges are my thing lately ;) I love that look. 

I did make one change... the sentiment... I put mine on the bottom instead of the top. So here are my versions of this sketch:


The colors say it all... It did not have to be spelled out that this is boy or girl card....if nothing else...the ribbons definitely say it all ;)


Luckily, some time ago I had bought this Paper pad for girl and boy....2 pads with similar papers and different shades. It made the decision making fast. Ready Sketch+ Paper pad already set= least time spent on making card :D


Even though I am not a fan of repeating designs... but when it comes to baby cards...making the same design in 2 colors makes it so much easier for the buyer. 

I am going to try making this one in neutral as well... I just did not have it ready in time for this post. Will update that as soon as I make it. 

Last look...


 This is all for today.

Until next time,

Happy Krafting,

Cheers =) 

Saturday, February 2, 2013

Baby Girl...Continued

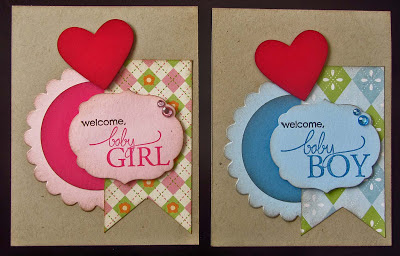
So almost 2 weeks ago.. I posted a card Baby Girl ... I had been meaning to make a Baby Boy card and a general baby card with the same sketch.

Reminder of the sketch...


So finally today I made the boy card


Everything is the same as the girl card, except the colors.... this is all blue....This would be perfect for Baby boy arrival.

But then I thought what if you don't know the gender. Some expecting parents like the surprise factor and will not find out the gender. So here is a gender free card:


I wanted to do Yellow, green and brown... but then just went with 2 colors to keep it simple. 


Since all of them were from the same sketch... all those elements remained the same, I kept the images same as well and just changed the colors. Even though the design and images are same, each card looks good in its own way. 


Although yellow brown is my favorite out of the 3...even though pink green was the 1st I made.... the yellow color is bright and cheery to me. 


That is all for today....

Until next time,

Happy krafting

Cheers =)