Monday, December 3, 2012

3-D 5-point Star

There are quite a few crafters who have channels on You Tube that you can subscribe to. So you tube has become one of the websites I visit daily to see if any new videos are uploaded. Over the weekend, I saw a video on how to make 3-D 5 point star made by Stamp with Frenchie - she has some nice ideas and makes nice videos... good explanations...and cutest little accent =) 

As soon as I saw the Star, I wanted to make one for my Xmas tree. So after I got my tree up yesterday, I made the star today...Oh so easy and cute!!

Well Frenchie has Video explaining the whole process of how to make it.... so I am not going ot mess around with that...you can find the video here - 3-D 5 point Star

Here is my take: 


In the video Frenchie uses 8-1/2" square and 6" square to make the Stars. Her process is simple and common..size of sqaure does not matter. I started with trying with a 8-1/2" square...then tried with a 12" square. But one was really small and the other little too big. So I made my mine with a 10" square designer paper. CUTE!!!


The rossette is made using 1-1/2" x 12" strip, scored at every 1/4". I added a little button and pearl  to it and glued the rossette to the star. I also used Golden glitter to the edge of the star. 

 
See the 3-D pop up.... pretty kewl :D and below is the star on my xmas tree :D I added a little ribbon loop to the back which slid down the top of the tree ......Looove it


I recommend trying this out... really doesnt need any fancy tools, nice paper, pencil, ruler and scissors will make a fine star. 

There is nothing like getting crafty during Holiday season ;)

Until next time,


Happy krafting

Cheers =)

Wednesday, November 28, 2012

All in One gift card holder

Hopefully everyone had a wonderful Thanksgiving Break.... I did with friends and their kids... made some kid crafts all week....It was fun. But its time I get back to regular things now. =) With Xmas season around the corned, I need to start my box of Xmas cards to send to friends and family. While going through ideas, I found this one All in one gift card holder by Kelly Gettlefinger at Always Stampin' -some nice ideas, wonderful video tutorials that you can subscribe to on youtube.com. So I love this gift card holder... its 3-fold and very different. 

So after watching the wonderful tutorial..I had to make one of these...Perfect for Xmas giving this time =) So here is the link to the tutorial ALL IN ONE GIFT CARD

Here is my version:


View of the inside:


The right most flap is where you can insert the gift card =) I use patterned paper to decorate the small flap that holds the gift card, but you could stamp a greeting there

Another idea-- instead of a patterned paper in the middle you could glue a cardstock and write personal message for the receiver of the gift card. You can also decorate the front--since the patterned paper I used on my belly band had "Ho Ho" on it... I did not want to put anything. 

One thing I realized-- I used bulky patterned paper...these are sort of raised (due to the embossing) so after folding and tucking the belly band, it becomes a little thick.

I also made a template for myself... wrote the measurements... that ways all I have to do is look at the template and I can recreate the wonderful gift card holder ;)


More holiday stuff to come...

Until next time,

Happy Krafting,

Cheers =)

Sunday, November 18, 2012

Christmas Art with Kids....

Festive season is on its way... prepping, shopping, decorating.... long list... It could be one busy time of the year.  So if kids are out of school, or you have toddlers at home... there is nothing like some holiday crafts. There are tonnes of websites or blogs you will find with wonderful ideas. 

I have some friends over staying with us for Thanksgiving... nothing like company in holiday season...they have 2 toddlers- 3-1/2 yr old girl and 1-1/2 yr old boy...Little girl is absolute crafting fan... loves stickers or painting and the likes... so after some thanksgiving coloring sheets, making sticker art, and sponge printing letters..... she remembered she needed some Christmas cards as it was almost time for Xmas. So we started our work... Took some base cards, stuck some stickers, stamped Merry Christmas greeting... and voila we had some cards.


Unfortunately I did not have enough stickers to have more cards... so we are going to make a quick run to the store and get some more so she can make more cards. But for now she is happy with her cards. She learned to write the letter T for her name... so she signed the cards in her handwriting and with some help also the receivers name inside the card and on the envelope. 

A simple but fun idea for kids to do.....makes them feel special that they made cards for friends and family and no doubt the receivers will feel equally special =) 

An idea to do with your kids or get them supplies to do it on their own if they are old enough =)

Until next time,

Happy Krafting

Cheers =)

Saturday, November 17, 2012

Flip Top Box

So am back after almost a month... work has been keeping me busy. The weather brings sickness, sick teachers.... more work for me :D

With Thanksgiving around the corner, and with Thanksgiving break for a week... have some time at home =) So of course the first thing I do is go through SplitcoastStampers -- can't stop praising their tutorials... So they had a Flip Box tutorial... a crayon box like box... its super cute for treats--chocolates or gift cards... I loved it!!


Cutest little thing...this box is perfect!! Since at splitcoaststampers they have perfect tutotrial with Video... I am not going to mess with it... Making the base box is very easy...the decorating with designer paper was a little tricky... Tutorial says to cut the DSP 1/8" shorter than the scored measurements... but I had to cut a little more. But once it is ready....simply fab!! I always wondered how could you make box with a flip lid--Click HERE for the tutorial.


Try making it.... perfect for the holidays =)

Until next time,

Happy Krafting

Cheers =)

Sunday, October 21, 2012

Wonderful Christmas Wishes


Another pack of 8 for sale on ETSY 

Wonderful Christmas Wishes for the loved ones this Christmas. I love the shade of green in the base of the card.... a bright cheery green paired with fun ornament styling and ribbons and elegant sentiment. This is not my original idea. I saw it somewhere (most probably on pinterest or Stampin' Up! magazine)...can't remember. All I remembered about that card was the ornament punched out and layered with DSP at the bottom which is then layered on a base card.


The Ornament punch was perfect I thought...the way the punches are built, it was only possible to punch out at the bottom or have upside down ornaments ;) So I tried to keep them on angle to create a different look. Even though it is a set of 8... neither of the set have the punched out ornaments in the exact place....remember...HANDMADE (key word) so there is no way for them to be same...they could only be similar ;)


Trying to keep the pack simple and not too bulky seems like I am running out of ideas to make cards....hope not... I need to make more... still have to make my set to send to friends and family :D

This is all for now...

Until next time

Happy Krafting

Cheers =)

Thursday, October 18, 2012

Seasons Greetings


Bright and colorful....this card is sure to bring smiles. Cute little ornament stamped, embossed with silver embossing powder and cut using the new Holiday Ornaments framelit die from Stampin' Up! I have seen actual ornaments that sort of looked like this one... blue base and some design with silver glitter on it... I have realized I have fascination for blue and silver combo... or for the matter of fact blue in Christmas cards. I mean red and green are definitely Christmas colors but I somehow associate blue with Christmas as well =)

This is a pack of 8 and is listed on Etsy.

I have popped the ornament a little bit... so when you try to mail this, it might require extra postage (when I send such cards... I usually add extra postage). 


Here are all 8 together:


Tell me these don't make you say MERRY CHRISTMAS =)

This is all for today

Until next time

Happy Krafting

Cheers =)

Tuesday, October 16, 2012

Snow Much Fun


I have used the Snow Much Fun stamp set from Stampin' Up!...it is a cute little set. I had seen other crafters use this set and ordered it. After having the set for over a month now, I had to use it. Love how it looks on this card--cute and simple. I stamped the image using staz on ink over glossy white cardstock (from Stampin' Up!) . 

Another pack of 8 for sale on Etsy


Until Next time,

Happy Krafting

Cheers =)

Monday, October 15, 2012

Seasons Greetings


Isn't that Santa cute???? Stamped and Hand cut... its the cutest little thing... The stamp is from Stampin' Up! (can't rem the name of the set). I love the red and green layering over the white textured cardstock... it just adds. 

another pack of 8 for sale on ETSY


Check our shop on Etsy =)

Until Next time,

Happy krafting

Cheers =)

Merry Christmas


Simple and cute -- Perfect for sending Christmas wishes to loved ones.... the Christmas tree (Stampin' up!) is heat embossed using White Embossing powder. I love the red and blue layers over the white. The base cardstock is textured.

I made this card for sale on Etsy..I had made a similar card last year... I used similar designs (removed the ribbon from old design) and made a pack of these. So this is a pack of 8.


I have been making sets since last week... for the local shop and Etsy.... I am not a fan of making sets of same design... but customer view point I see how it is beneficial to buy card in sets. 

This card is for sale on Etsy

Until next time,

Happy Krafting 

Cheers =)

Wednesday, October 10, 2012

Frosty Holidays

With husband off from work and dentist visit on my to do list, it was a slow card making day for me....and believe it or not it was easy card design. I used the Frosty Friends stamp (Stampin' Up!) and the greeting from Many Merry Messages (Stampin' Up!). Some Black Staz on ink and Stamp-A-Ma-Jig positioner and voila...perfect little card :D


I do agree...coloring in was a little work..... but hey nothing is more relaxing than coloring while music plays in the background ;) This is a set of 8. 

Btw the Stamp-a-ma-Jig tool... I have had it for almost 2 years....but I did not know how to use it and never did until lately.... it is definitely a good tool to help you position your stamps to get a straight-er image. Luckily I found Video which shows how to use this tool. I might be late to this party.... but I am glad I am here =) 

This is all for today

Until Next time

Happy Krafting 

Cheers =)

Tuesday, October 9, 2012

Seasons Greetings

Another of my productions today....2 designs in 1 day...I'm on a roll ;) .... well this one was quick and simple. 


The Tree stamp I bought from Michaels some time ago..have used it few times now... love how the words are written. Since it had the wishes... Seasons Greetings sentiment seems appropriate ;)

Sentiment is from Many Merry Messages Stamp set from Stampin' Up!

I was not sure of how golden looked on white... but with the red ribbon, white pearl as a topper--I was content!!

This is all for today,

Until next time

Happy Krafting

Cheers =)

Warm Christmas Wishes

I have been making Set of Christmas cards for sale... i am not a fan of making multiples of the same design... But I understand the need to have a set of the cards to sent to family and friends rather than buying individual cards. So after making 3 sets, I started to think what next design should I make-easy to replicate?? Going through all my holiday stamps, I found this one I had ordered from Stampin' Up! Holiday catalog- Make A Mitten . It has a coordinating Mitten punch. So I thought about a simple card with some punched out mitten and little message. I had the perfect message to go with the card. 


So I stamped the snowflake image, heat embossed and punched out the mittens and used 3-D glue dots to pop them up. Its just funny how the message goes perfect with the mitten idea :D

Aren't these perfect to send =)

This is all for now,

Until Next time,

Happy Krafting

Cheers =)


Monday, October 8, 2012

Snowflake Christmas


So here is a card with embossed snowflakes and cute little ornament punched out. 

Stamps: Serene Snowflake (Stampin' up!) and Petite Pairs (Stampin' Up!).

I used White embossing powder (Stampendous) and heat embossed the image. 

The ornament is popped up with 3-D glue. 

I was not sure where to put the ornament, center or side (like in pic). On one card I put in the middle and the other one I put it on the side, 15 minutes of staring and I decided on the "ornament on the side" look =)

Here is my set of 8


This is all for now.

Until Next time

Happy Krafting

Cheers =)

Thursday, October 4, 2012

Seasons greetings


I was trying to make a design simple to make a pack.... and so this was just the thing. Christmas tree stamped with versamark and hot embossed with Silver powder... I love how the silver pops on red cardstock! The sentiment was stamped and popped. But it looked pretty empty so I added the green pearl (Gosh I feel proud for picking them up when I saw them in Michaels like months ago!) and added a thin green ribbon-good red and green combo...perfect Christmas colors. The Tree and sentiment are from Stampin' Up!'s Snow Swirled Set. 

This is a pack of 8 cards that will be on sale in the local store :D

Until Next time,

Happy krafting

Cheers =)

Tuesday, October 2, 2012

Christmas Tree Card

So I have been away for a while now... had been working as a short term sub in a classroom- 3 weeks of busy routine and work. But that has come to an end. So today has been an absolutely lazy day. My husband bought me a new phone yesterday... so spent the morning setting it up, playing with it, exploring it =) I LOVE IT--I have always been a Blackberry person... but had to move to Android-Samsung galaxy S3.... and Love it...oh the possibilities!!!

Anywaz so after morning of playing with the phone, I decided to get to my craft table after 3 weeks! Oh how much Ive missed it..did not realize until I sat on the chair and started thinking about what I wanted to make. The owner of the local store that helps me sell my cards had mentioned about making Christmas cards and selling them in packs instead of 1 card... so I decided to try that out. New Stampin' Up! magazine issue came in the mail last week and it has this cute little card with Christmas Tree made of paper strips- Simple and cute... I loved it. 

The original card opens horizontally and had rounded edges. I gave it my twists and made my own. This one opens vertically.


Technically you have to have a star at the top and I don't have a small star punch (something I need to invest in now :D) so I used the Boho Blossom Punch from Stampin' Up! and placed it to make it look like star and added the pearl. I think its pretty close =) The simplicity of the card beats everything.... cut strips of paper in different sizes and put it together to form a Christmas Tree.

Now 8 of them together =) 


Cutting the paper was a little tedious... but once I had everything cut- it just assembling everything. 8 cards done in 1-1/2 hr...I think.... But they turned out super cute. 

One last look


Until the Next creation,

Keep Krafting,

Cheers =)

Tuesday, September 4, 2012

Cube/Flip box

After trying the bag yesterday... Frenchie Stamps posted a video today called Flip Box. The box is made using 1 cardstock and decorated with some patterned paper. Some scoring and cutting and this box comes together in a jiffy ;). Frenchie gives awesome instructions in the video....so nothing like watching her and constructing the box. Watch the video Here

This is how the box looks like:


 When you untie the bow, the box opens up......


The final box measures approx 2-1/2" x 2-1/2" x 2-1/2"- more like a cube. But it is perfect as a favor box or gift box for small trinkets. The video shows using strip of cardstock to seal the box. I liked the ribbon better (I am all about ribbons). So I used that instead.

Also in the video, when scoring the CS, she says 2-3/4" one time and 3-3/4" second time, the actual scoring measurement is 3-3/4". I got confused myself, so I watched the video 3-4 times to make sure and also made a template for future reference. 

Here is the template:


Another thing I realized was it would be easier to put the patterned paper on before putting the box together. I used tombow glue to stick the paper on... would be much easier before I put the box together. So for future reference I also wrote on the template where to put the patterned paper.


But this is the cutest little box I have made... and I had told my friend "D" today that I as done making boxes and bags and wanted to make cards and here I am making a box ;) 

This is all for today,

Until Next time,

Happy Krafting,

Cheers =)

Monday, September 3, 2012

Fancy Border Bag

You tube has so many crafter's channel. I have subscribed to few...so every time any of those channels have new videos...it shows up on my main page as well. So yesterday I saw Frenchie Stamp's video on this purse/bag. She used an Edgelit die to create kinda fancy looking bag. I loved how it looked and had to try it out. It is super cute... this is my version:


Due to the patterned paper I use it might be a little difficult top see the top border...has like a curvy fancy edge. She has made a video showing how to make this-which is pretty good. Just watch it HERE 
Surely getting the edge right looks tricky and it is... I ruined one paper and had to try it 2nd time... but got it right time this time =) 


Like you can see... it is patterned paper covering a box. The box is 1" wide and approx 3-3/4" tall, while the patterned paper is close to 5" tall-giving the bag a taller effect.


Like you see it is not as wide... but it is perfect to hold little trinkets/candy/gift card. The border makes it look super cute I think... I am going to try it with other edgelit dies... just to see how it looks. So do watch Frenchie's video (love her accent :D) and enjoy making the bag.

This is all for today,

Until Next time,

Happy Krafting,

Cheers =)


Friday, August 31, 2012

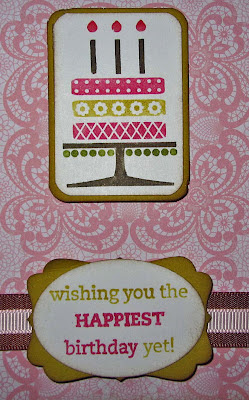
Happiest Birthday Wishes

Another Birthday card today. Simple, cute and pretty. No fancy work for the today's card-sometimes simplistic things look for nice as well. 


The background paper is simply marvelous. Makes the card look elegant I think. A cake and simple wish with pretty double ribbons complete the card.


This card is for sale on Etsy: Happiest Birthday Wishes

This is all for today,

Until Next time,

Happy Krafting,

Cheers =)

Thursday, August 30, 2012

Birthday Bunch

Here is a cute little card with a cute color combo and stamp set called Upsy Daisy from Stampin' Up! A cute little stamp set I think.


The image is stamped with versmark ink on White CS and embossed with Clear Embossing powder. This gives a pretty little shine to the image. Then I used 3 different colors-sponged them on the CS with the image. Since the image is embossed, it won't catch color. Once all the sponging is done, just use a dry paper towel and swipe across, any residual ink on the image will come right off. It just adds the extra oomph to the image I think ;) 

Closer look:

This card is for sale on Etsy: Birthday Bunch

This is all for today,

Until next time,

Happy Krafting

Cheers =)

Wednesday, August 29, 2012

8-1/2" x 11" Cardstock Box

So I was surfing on pinterest and somehow I reached this blog which had this box/bag made out of 8-1/2" x 11" cardstock. Unfrotunately I closed it before saving the blog add... and I accessed it via my Ipad and now can't find it :( I am sorry to that blogger .... if I knew your name I could credit you for this. 

Coming back to the box...I have made a similar box. The difference between the One Sheet box and this treat box is the scoring lines. The instructions for One sheet box on Splitcoaststampers is well described with a video. 

To make this box, you just score on 11" side at 3/4", 4-1/2", 6-1/2" and 10-1/4" and on 8-1/2" side you score at 2" and 6-1/2". Follow rest of the instructions as shown in One sheet box


So it is little...wider than the one sheet box. The final bag/box measures 4-1/2" length, 2" wide and 4 -1/2" high. It is perfect for favors or giving out treats.


I added velcro closure so it stays well and can be picked up using the handles.


This is all for today,

Until Next time

Happy Krafting,

Cheers =)


Tuesday, August 28, 2012

Lacy Birthday

So with its new catalog, Stampin' Up! came with some new stamps, punches, and dies. The stamp set I used for this card is called Lacy and Lovely. It has these pretty images, which can be stamped to create background or can be stamped and punched. They are just super pretty. Since I wanted to make a birthday card, I knew it was going to be bright and pretty. So I decided to use Summer Starfruit and Melon Mambo and decided to stamp and emboss the Lacy image. I had recently bought pink opaque embossing powder- matched perfectly with melon mambo ;) 

So I took a piece of whisper white and randomly stamped the Lacy image over the CS with versamark ink, added some embossing powder and voila...had a nice bright layer for my card.


The picture looks so pretty n bright.....think how it looks in person :D So with the sentiment I felt it still felt like it needed something. So I added a ribbon (I love my ribbons)-COMPLETE. 


Love how the image turned out and how the whole card looks =)

This card is for sale on Etsy

That is all for now,

Until Next time,

Happy Krafting,

Cheers =)