Thursday, September 5, 2013

Merry Little Christmas

Back after a weeks break :) Its been a little hectic....studies, looking for new job in new city and working with current job!! Did not get chance to enter my craft room for past 10 days. Finally did today! Created another set of Christmas cards ... need to drop off new lot at the boutique I sell. So decided to make 1 last pack of Xmas cards. 

So this design is not from anywhere particular... I had seen people making cards using banners laid out separately....on Pinterest ofcourse....So I decided to go this layout. I used Xmas papers to create banners. I used a glue dot to glue the knot down to the card so the ribbon wont keep moving.

The sentiment is from Technique Tuesday's Good Cheer by Ali Edward. Awesome set with wonderful Christmas messages. I popped the sentiment. 


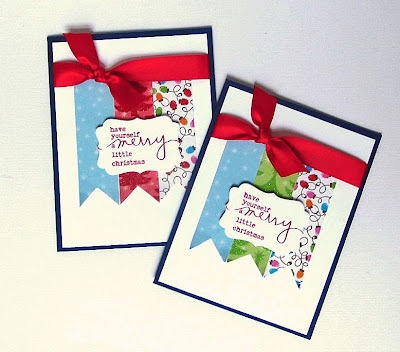
I used 2 different colors for the middle banner... its the same Tree design paper...just red and green color. So made 4 of each color. After setting it all on the white CS, I felt it would look nice on Navy cardstock. The ribbon and the banners pop I feel! 

The set of 8 :) 

This is all for today.

Until Next time,

Happy Krafting,

Cheers =)

Thursday, August 22, 2013

Housewarming Wall Art

I have always made wall art for my house.... I usually do free hand art work with ....so if it does mess up a little... who cares... once on the wall or high up on the cabinet no one will be able to tell. This time a friend asked me to make something for her to gift to her friend for housewarming. Scared me a little...but I agreed.... Little pinterest search... gave her options.... she picked 2 that she wanted and so I got cracking on them yesterday.


The big one is 16" x 20"... The original art work was on wood... So I painted the canvas with brown paint and use Titanium White over it... Free hand the writing and used some walnut distress ink on edges and all over the canvas... 

The smaller one is 12" x 12" and has small little phrase. I used Gorilla glue to glue the ribbons in the back....Gorilla Glue should hold it strong I think. I used Black and Silver-grey satin ribbons. 

I liked how it turned out....hope my friend does too and the receivers of the gift too. But I do appreciate my friend giving me this opportunity to make this art work ( helped me increased my confidence to make wall art for others :D) 

Until next time,

Happy Krafting,

Cheers =)

Saturday, August 17, 2013

Santa with gift

Today's card is cute santa with christmas gift for you (provided you have been on the good list :D).... I used Darcie's You look like Santa Claus Christmas Stamp set.... 14 different stamps that can be combine to make many different images. I used the santa and gift from this set. The sentiment is from a set from Stampin' Up!

That is one cute santa :) and these polymer stamps are just perfect...they allow you to see through and stamp at the right place. 

Lately I have become stickle freak :) So i used some white stickles on the edge of the hat and the coat.... fluffiness :)

Pack of 8...ready to be sold =)

Until next time,

Happy Krafting,

Cheers =)

Thursday, August 15, 2013

Glitter Christmas Bubble

Today is all about glitter :) I used Bubble Tree by Stamping Bella Stamp Set from Simon Says Stamp and filled in the bubbles with glitter...stickles to be precise. 
I like the multi colors.... red, green, golden, silver and white.... Oh all the glitter... and the sentiment.. just adds to the fun and whimsical look. The sentiment is from Paper Smooch's Joy Greetings by Kim Hughes. The Christmas Tree is stamped on Window Label Die from Stampin' Up!


The card is pretty simple without any rhinestones or ribbons... but all the bling from the glitter makes it just perfect for sending Christmas wishes =)

Until Next time,

Happy Krafting,

Cheers =)

Wednesday, August 14, 2013

Bright Christmas

Today's card uses another of the stamps I ordered from Simon Says Stamp. It is called Holiday Blessing by The Greeting Farm. It is a set of 4 whimsical, fun stamps. So here is my card:
The stamp was the light with the sentiment at the bottom. I tried covering the sentiment with tape and inking the image, removing tape and stamping repeatedly....was a little too much. So I decided to do some snipping ;) Image and sentiment seperated! Stamping easy. That is one thing I love about photopolymer stamps. Easy to snip and use, and the see through capability allows to create repeated patterns. 


So I wanted to add ribbon.. after 5 cards I run out of the 1/4" Red Ribbon from Stampin' Up! to find that I don't have a spare ribbon reel either :( ....time to reorder.....I had to undo the ribbons from the cards and instead put red rhinestones. Nevertheless, it turned out nice :) I did pop the sentiment....


Here is the pack of 8.... I like the colorful bulbs :) How fun would it be to receive this card or send them out to family and friends?

Until next time,

Happy Krafting,

Cheers =)


Tuesday, August 13, 2013

Greetings of the Season

Simon Says Stamp is my new stamp shopping haven!! Loooove the place...many brands at one place... and such awesome and cute designs.... for stamps and dies.... and reasonable price!!! Last week I ordered Christmas stamps from there which came over the weekend. Love each and every one of them!! My card today uses Stampin Bella's Envi Full of Cheer Stamp... cute little envelope with holly berry springing out =)


I used Black Staz on to stamp the image, then colored in the berries and the leaves. But then I decided to use red stickles for the berries and gold stickles on the envelope. Layering it with simple Red cardstock really popped the image I think. 


The sentiment is stamped, cut using die and popped using 3-dimensional glue. I added the red rhinestones to add interest.


I made a pack of 8 :) I am getting better at making packs ;) 

Until next time,

Happy Krafting,

Cheers =)

Saturday, August 10, 2013

Reindeer Greetings

My card today is inspired from a cute little christmas treat box that I found on Pinterest.... Suppaaaah Cute!!!

Photobucket

I loved the reindeer and the hooves holding the sentiment. If you want to learn how to make the cute treat box, you can click HERE. As soon as I saw this, I could only think of making a card using the reindeer. Hence started my attempt to making a set of Reindeer Greetings.
The picture above shows all the punches and dies I used to assemble the cute little Reindeer. The sentiment was stamped and die cut using the new Chalk Talk Die and layered on a hand cut rectangle frame. 
Once all of it is cut... the reindeer assembly is super easy.
Isn't he cute?? I just loved him... now all needed is a card base (5-1/2" x 4-1/4") to put the reindeer face, antlers, hooves and the sentiment. 

I love it =) It is suppper cute... now 7 more of these to go :) 

Until Next time,

Happy Krafting,

Cheers =)

Friday, August 9, 2013

Christmas Tree Greetings

Every year when I make Xmas Cards, I always make atleast 1 card or 1 set of cards ;) with Christmas tree on it. So last year the Circle folded Christmas tree was very popular. I never got to making those. So this year, I decided I was going to make set of cards using the folded christmas tree. I wanted to use big scallop circle to make these trees, lucky me...I found a video on you tube, where a lady used the exact die to make the trees :) So here are the trees I made....


The Video explains in detail how to make these, so I am not going to go over that. The only thing different I did from the video was, use 3-dimensional glue to pop the layers, instead of keeping them open. 


Of course, I also added some gold stickle dots on the edges, a little star with stickle dot :) So here is the card I made:


I used 2 different printed papers, I decided to use different colored scallop circles for background.


Yes, making 8 trees, cutting the scallops, embossing, stamping sentiment... took some patience. But once all was ready, I created an assembly and 8 gorgeous cards were ready in no time ;)

Until next time,

Happy Krafting,

Cheers =)

Wednesday, August 7, 2013

Santa Greetings

Another set of cards today... for Christmas :) I have this stamp set called Santa's List by Your Next Stamp...Oh I love YNS's whimsical stamps...cute and fun!! I had this idea of using the main stamp in this set and make it the centerpiece of the card. Love how the card has turned out. 


The sentiment Holiday Greetings is also a part of this set. I loved stamping the outline and then coloring in at different places... made 8 of these images...layered them... and 8 cards later... I found it too simple...so I added green rhinestones :) 


The image is popped up using 3-dimensional glue. It really does not show in this pic... but it does make a difference in the way the green looks. Nevertheless, 3-1/2 hrs later... 


.......My pack is ready

Until next time,

Happy Krafting,

Cheers =)

Monday, August 5, 2013

Christmas Ornaments

So it is Augusta (WOW!! This year flew) and in no time Christmas will be here... So I decided to start making Christmas cards for the boutique we sell through and our Etsy store. So here is the 1st card this season :)

The layout looks familiar??? I used CAS(E) this Sketch's Challenge 37 sketch...even though the challenge is closed...I thought it would be cute to use with these ornaments :) I love this sketch... I have thought of 1-2 more ideas of using this sketch :) 

I used Green Pearlustre embossing powder, punched out the ornaments and ran them through Xyron to make the ornament stickers which I laid out using a ruler (wanted to get them as straight as possible). 

I like how they turned out... wondering if should make a pack of 8-10 or just sell 1?? Any suggestions?

Until next time,

Happy Krafting,

Cheers =)

Birthday Pearl Chalk

As like all crafters, I love to watch technique and product videos on You tube...there are few channels I have subscribed to, and I simply love the video suggestions they give depending on what you see :) I came across a video of how to use Perfect Pearls (with binder in it)... Susana, the lady in the video explains all different ways you can use these powders... simple as is, paint with it, emboss with it, mist with it.... love it... I know it is not new out there... but new technique for me and finally I know how to use it :) If you are a novice like me...you can watch the video HERE. She explains it very well. 

So finally I decided to try it today.... I started with using it on white (don't have a picture of it) it was pretty light... and I did not remember to use Susana's suggestion of misting and letting it set. So it kind of rubbed out... so this time I decided to do it on black... and then remembered the suggestion, checked the video and followed it. 


That is how it looks...GAAAWJUS!! Love the sparkle it adds :) and surely after misting it with water (I also used heat gun for quick drying)... it looked perfect. Will try on white again :) 

So this card is made for 2 uses--one to send to a family member whose birthday is coming soon :) and to enter it for challenge at Indian Craft Room (ICR). The challenge was to make a card with Butterfly theme with twist of brads or buttons- ICR31

So here is the full card....


Girly girl pink and purple I know :) I think the receiver is pretty girly ;) Hope she enjoys her birthday and gets this in time ;)

Until next time,

Happy Krafting,

Cheers =)

Wednesday, July 31, 2013

Mini Legal Pads

Here are 2 mini legal pads that I created today ... love those mini pads( easily available at any office store)....perfect to keep in the purse or car or at your desk or by the phone... Christmas is coming...these would be perfect stocking stuffers :) I had posted tutorial on how to make these almost a year ago.

So my creations today.....


Love the blue-yellow-orange color combo...turned out cute I think :) The little coffee stamp is from Patterned Occasions by Stampin' Up! 
This one is of grey, red and blue combo. Love the little heart.... it came from a DSP pack sold by Stampin' Up! (can't rem the name), the DSP used is from the same stack. The 2 stamped images are from Label Love and Ciao Baby (Stampin' Up!). 

This is all for today,

Until next time,

Happy Krafting,

Cheers =)

Tuesday, July 30, 2013

Hexagonal Birthday

My whole summer has gone studying... At the end of last school year I had decided that cleaning and crafting were 2 things I will do over the summer....Cleaning never happened :P and crafting happened here and there!! Well... nevertheless summer semester done, a week of road trip enjoyed....and one more week left before work starts, so had to get back to crafting :)

Another Birthday card, made using CAS(E) This Sketch's Challenge #37 The layout was simple...with hexagons. The challenge has passed, but I like the layout.


Another reason I wanted to use this layout was Heidi Swapp's new stencils available at Michael's. I know there are many stencils available...but they have super cute designs, they are available in 2 sizes - 6"x6" and 12"x12" perfect for cards and scrapbooks. (Let me say, I am not being paid for promoting these stencils :) its all me... always love to experiment with new products and share :D) Apparently these are hot sell in the Michaels near my house.. esp the 6"x6"....most designs were sold out!

So here is my creation using the stencil:
 

 For this card I used the 6" x 6" Honeycomb Stencil .... good complement to the Hexagonal Punch :) ....The Hexagon stamp and the punch are Six Sided Sampler Bundle from Stampin' Up! The little stamps are from Birthday Stamp Set from Art Gone Wild (had bought them from a stamp show years ago). 


I simply used a sponge to color in the stencil. The images in the hexagon are stamped with Black Stazon and water colored. Also decided to pop them up using 3-dimensional stickers.

It feels nice to get creative :)

Until next time,

Happy Krafting

Cheers =)


Tuesday, July 9, 2013

Road to Happiness Wedding

Here is a card made using sketch from Freshly Made Sketches. I could not play this sketch, but I still decided to make a card using sketch #93 A very simple layout. 

Here is the sketch:


Here is my take on this sketch:


I have had this stamp set "Road to Happiness" by Stampin' Up! for a while and never used it...But with this layout it sits perfect. It is 2 step stamping set... so the car and the bride and groom and hearts are all different stamps from the same set. You have to stamp them separately. Stamp-a-ma-jig is perfect for such occasions =) I decided to let the hearts spill out on the white layer of the base.... just adds to the fun I think :)


I popped the image..... and let the sentiment sit on the image layer. I ended up layering the sentiment as well. In the end, I used some white stickles to fill in in the hearts with outlines. 

This card is for sale on ETSY

Until next time,

Happy Krafting,

Cheers,

Shraddha =)

Monday, July 8, 2013

Lamp with ice-cream sticks


Hi Friends,

You will not see many posts by me as am not as active and as regular as Shraddha. Though we both started KK together, but I somehow got busy with other things in life. Trying to get back to crafting.

So here's a lamp that I have made with ice-cream sticks. A simple and easy project to start with. Reminds me of my school days when we made cute little things with ice-cream sticks. This is just an extension of  those little things I made. I did take some help with assembling and installation, but its doable.

Please feel free to leave comments and/or suggestions. 

Monday, July 1, 2013

Birthday Cheers

This card is inspired from Clean and Simple Stamping Sketch # 241. Fun little sketch, was fun to make with the bright colors. 

The sketch: 

 
Here is my take on this sketch:


 Simple, yet fun... with the little martini glass =) is the best way to wish birthday cheers to a friend. I stamped the drink image, hand cut it, and popped it using 3-dimensional glue. It is the Happy Hour Stamp set from Stampin' Up!

I tweaked the sketch a little and embossed the whole background instead of 1 edge. With my color combo and this image, I did not want to use any Designer paper, so instead embossed the background. 

I used a thin green ribbon and made a cut bow under the glass.

This is all for now,

Until next time,

Happy Krafting,

Cheers =) 

Happy Birthday Banner

I am really enjoying make cards using sketches from all the wonderful blogs. This card is from Clean Simple Stamping, sketch # 247.

The sketch:
 
 So here is my take on this sketch:

As soon as I saw the tapes, I knew I had another chance to use the Tape It Stamp Set from Stampin' Up! I tried to combine image and the sentiment- used the banner :) 


For a change I did not pop anything =) But after I was done, I though the card lacked something. So I decided to use blue rhinestones- Perfect!!

Fun sketch and fun card =)

Until next time,

Happy Krafting,

Cheers =)

Friday, June 28, 2013

Birthday Cake banner

Today's card is inspired from sketch at Clean and Simple Stamping, Challenge # 245. The Sketch:
 

So here is my creation:
Banners just make the card so cute!! I love using banners on my card. This is going to be one of those sketches I might just use often with all those banners :)


So I decided to pop the label and also popped the little cupcake on it....Now cupcake is perfect anytime dessert...but birthday cupcakes are just different :) It perfectly fit in the circle... so that was awesome.


I like how the mustard and green show up on the red....due to those 2 colors in the banner, I stamped the sentiment, label and cupcake icing in red... sweet and simple.

This is all for today,

Until next time,

Happy Krafting,

Cheers =)